Pages

Banner

Banner

9.14.2011

Getting Ready for "The Big One"

Crafting blog!!  LOL So I am doing my very first craft show in about 7.5 weeks!! OMG!  I have about a million things on my mind!  This is supposedly a pretty big show for this area.  It is held over opening hunting season so all the wives come to this craft show supposedly.  I am sharing the booth with a fellow WAHM to cut costs so her and I have been talking about everything and trying to get everything organized.

My biggest fear is that I will run out of items.  Since all my things are crocheted it takes me a while to make them, especially now with a newborn!  AND with going back to work at my day job (even though it is super part time) So instead of saying I'm going to make X amount of headbands or hats or whatever I'm pretty much just going to craft in any little free time I have and then take custom orders if I run out.

I am planning on bringing my Interchangeable hats and headbands.


My cupcake and donut pincushions.


Hair bows and possibly flowers if I can get some made!


And then I do plan on having my doily name banners available for show and then take some custom orders.

So I have 7 weeks to make as much as I possibly can, along with orders and I have 2 giveaways on some blogs coming up this next week or two!!!  Oh boy,  I hope I survive!!!

P.S. if you would like to purchase anything you see above just visit my Etsy shop or email me at sallystitches31@yahoo.com

Meal 7 - Buffalo Chicken Calzones

So I made these at the same time I made the BBQ Beef Cups.  These were SOOOO easy!!  Since it made about 8 calzones I froze them for a quick meal.  Ok so on to the recipe!

Once again I got my recipe from the Once a Month Mom website....I promise I'm not addicted...ok maybe I am!  She just posted a recipe today that I have been looking for for about a year!!!!  Sooooooooo excited for it!
Ok on to this one though :) The Buffalo Chicken Calzones are oh so yummy....

Ingredients:

  • 0.5 cups ranch dressing
  • 3 Tablespoons hot sauce (or your favorite buffalo wing sauce)
  • 1.33 cups celery, diced
  • 1 cup Mozzarella cheese
  • 1/2 batch of homemade pizza dough (or 2 cans refrigerated pizza dough)
  • 4 Tablespoons olive oil
  • 1 teaspoon garlic powder
  • .25 cups Parmesan cheese

Directions:

If making your own pizza dough, mix and allow to rise. When pizza dough is ready, roll into a 2 14×17 sheets (approximately). Preheat oven to 450 degrees. Cut into fourths with a pizza cutter. In a medium bowl mix together chicken, ranch dressing, hot sauce, celery and Mozzarella. Place chicken filling on each of the 8 squares of dough. Fold the dough over and pinch/seal the ends.
Place calzones on a cookie or baking sheet and brush with olive oil. Sprinkle with garlic powder and Parmesan cheese. Place in preheated oven for 15-20 minutes or until baked and golden brown. Remove and serve.

Freezing Directions:

Follow all directions above including baking. Set aside to cool or flash freeze. Place in gallon size freezer bags and freeze. To serve: Remove and reheat in microwave for 1-2 minutes or in oven for 10 minutes. Serve.

So I ended up using canned chicken for convenience.  I used about 2 large cans worth, but I measured it in a measuring cup.  And then I didn't have mozz. cheese so I used colby jack and it tasted just fine. 

I mixed all the 'innerds' together:

Then I just used canned pizza dough, rolled it out, and cut it into 4 sections.  I plopped some mixture into each section.  I do kind of wish I would have rolled out both cans and did the insides all at once because my first batch wasn't stuffed as much as I could've done and my second batch was almost over stuffed because I had to use up the chicken mixture. 

Then you just fold corner to corner and make a triangle.  I then rolled and pinched the ends shut.  Be careful not to tear the dough!


Then you just bake!!!  Super dooper easy and they look kind of fancy!


We froze em and just warm em up in the microwave.  I dip mine in ranch and it is sooo yummy!!!  I will definitely be trying different fillings now that I know how easy it is to make calzones!!

9.12.2011

Meal 6 - BBQ Beef Cups

So I promise I didn't fall off the face of the Earth!  I didn't cook anything for a couple days last week due to work and other things.  We had a rummage sale last weekend so my week last week was nutso!  I did get some cooking in over the weekend though and we found a couple new recipes that will be used again!  I made Barbecue Beef Cups for lunch on Friday and it just so happens they are the featured recipe today on www.allrecipes.com  They were super quick and easy and we gobbled them up!  My husband has requested these again already!! 

Ingredients: (I had started to brown the meat and almost forgot to take a picture!)

Ingredients

  • 3/4 pound lean ground beef
  • 1/2 cup barbecue sauce
  • 1 tablespoon dried minced onion
  • 1 (12 ounce) package refrigerated biscuit dough
  • 1/3 cup shredded Cheddar cheese

Directions

  1. Preheat oven to 350 degrees F (175 degrees C). Grease the cups of a muffin pan.
  2. In a large heavy skillet over medium heat, cook beef until evenly brown. Drain excess fat. Stir in barbecue sauce and dried onion. Simmer for a few minutes over low heat.
  3. Flatten each biscuit, and press into cups of the prepared muffin pan. Make sure the dough comes to the top of the pan. Spoon a portion of the meat mixture into each dough cup.
  4. Bake in preheated oven for 12 minutes. Sprinkle with cheese, and bake for 3 more minutes.
I obviously used dried onion once again instead of a real onion.  The biscuits were kind of hard to form in the cupcake pan, I may try jumbo biscuits next time.  And then I didn't measure the BBQ sauce when I added it to the meat.  I just eyeballed it cause I wanted them pretty saucy.  I'd say it was probably closer to 3/4 cup. 

Before cooking:

After cooking:

YUM!!  I may try taco cups next time by adding taco seasoning to the meat and using Mexican cheese.  Topping with sour cream and salsa maybe...


9.05.2011

Meal 5 - Jalapeno Beef and Corn Bread Pie

So before I write about tonight's dinner I just wanted to say how I can't believe the response I've received from friends that are reading my blog and trying out these recipes.  It's so awesome that I'm able to bring a little cooking to their homes!  This started out as a challenge for myself and my husband on a mission to eat out less and me hone in on my cooking skills and it's turning out to be something awesome for my friends to read and try as well!

On that note dinner ALMOST didn't happen tonight!  I forgot to take the ground beef out of the freezer to thaw until about 15 minutes before I was gonna start dinner! Crap!  So I do have this really awesome kitchen gadget that is like a cast iron plate of some sort, I honestly don't know what it's made out of or how it works but it defrosts food faster and so I threw the meat on there for a little but and then just fried it halfway frozen!  Ooops!

So tonight's recipe was Jalapeno Beef and Corn Bread Pie.  I got the recipe from those recipe cards you receive in the mail and they want you to sign up for them to come every month or so and then charge you oodles of money until you quit.  Yup well I did that many many moons ago and decided to dig through them for some recipes.  I did find the recipe online as well but I changed a couple things around of course.

Ingredients

  • 1 pound ground beef
  • 1 cup yellow cornmeal
  • 1 cup milk
  • 2 eggs
  • 1/2 teaspoon baking soda
  • 1 tablespoon melted shortening or bacon drippings
  • 1 (8-ounce) can creamed corn
  • 3/4 teaspoon salt
  • 1 large onion, grated
  • 1 pound sharp Cheddar cheese, shredded
  • 5 canned jalapeƱos, chopped

Directions

  • 1. Preheat oven to 350°F. Heat a medium skillet over medium-high heat; add beef. Cook, stirring continually, until browned and crumbly, about 5 minutes; drain.
  • 2. Grease a 10-inch ovenproof skillet or baking pan. Combine cornmeal, milk, eggs, baking soda, shortening, corn and salt in a large bowl.
  • 3. Spoon half the corn bread batter into prepared skillet. Spread beef over batter. Top with onion, Cheddar and jalapeƱos.
  • 4. Spread remaining corn bread batter over filling, covering completely. Bake until browned on top and cheese is melted, about 50 minutes.
Here's all my ingredients:
Once again I used dried onion flakes instead of an onion because we don't eat onion much AND the smell of em seriously makes me vomit!  And then instead of using cheddar cheese and jalapenos I decided to use pepper jack cheese!  Yum!
So I took some prep pictures but they didn't really turn out unfortunately.  But you just layer half the cornbread mixture in the bottom of a dish (I think mine was a 1.5 qt?) and I did spray with cooking spray and then sprinkle loose corn meal on the bottom.  Then layer the beef which I browned with onion flakes, salt and pepper.  Then I used about a cup or so of cheese, just until the beef was covered.  And then the rest of the cornbread mixture on top.  Now for some reason in the recipe it says to only use 8oz of creamed corn....yeah I dumped in the whole can!  What the heck am I gonna do with half a can of creamed corn?! 
Right before putting in the oven:
And out of the oven:
And it did taste as good as it looks...I am a corn bread-aholic so anything with cornbread to me is awesome.  The meat was a different kind of texture and then the pepperjack cheese added just the right spicy flavor!  We also drizzled honey on top of our pieces which was perfect, a little sweet with the spicy! 
Yum!

9.04.2011

Meal 4 - Slow Cooker Beef Stroganoff

Yummm this is one of my favorite recipes.  It's good comfort food for us in this house.  And I'm a sucker for a slow cooker meal!  This recipe comes initially from one of my FAVORITE recipe websites, http://www.allrecipes.com/
Here is the link to the actual recipe: Slow Cooker Beef Stroganoff
And then these are some of my modifications I make:
  • Use 2 cans of Golden Mushroom Soup, more sauce and make sure to use the Golden Mushroom, the flavor is just right for this recipe.
  • Add a beef bullion cube
  • Add a spoonful of sour cream
  • I use dried chopped onions opposed to an actual onion as neither of us are big on onion flavor
  • I saute mushrooms about a half hour before it's done and add them in.
  • Cut the time to only about 5-6 hours at the max on low heat
So here are all my ingredients:
I put the meat, soup, Worcestershire, dried onions, bullion cube, cream cheese and sour cream all in my slow cooker.  I used a 4 quart size and it was just fine.

I would check on it occasionally, unfortunately after only probably about 3 or 4 hours it was boiling and starting to burn in my crockpot so watch it carefully!!!  I actually just turned it down to warm and left the cover slightly ajar to cool it a little while I sauteed the mushrooms.
Mmmm how I love sauteed mushrooms...I can practically smell them!!!  Once those were done I just mixed them in with the rest of the stuff.

Then right before we were gonna eat I made the egg noodles to serve with it.  I made about half a bag whatever that is! LOL I boiled them for only about 5 minutes so they didn't get too mushy.  I then just dumped them in the slow cooker.  Sometimes I leave them so people can dish their own noodles and sauce but then you always run out of one or the other!
I mixed them around and did put the cover back on just for a couple minutes for the noodles to soak up some of the sauce!  Yum!
Then we scooped it into bowls and put another dollop of sour cream on top. 


We gobble this stuff up.  My hubby and I are suckers for mushrooms (as you're probably finding out!) and you can't get better than some good hearty food!
We had a ton left over, we both wanted seconds but were stuffed after our first helping.  So we now have enough for lunch tomorrow and then some!

This will always be a go to recipe for us, it's nice on a chilly night which tonight was!  Fall is coming fast!  I hope you try out this super easy, yummy meal!!

Meal 3 - Fake Em Out Ravioli Lasagna

So this was actually last night's dinner, I just didn't have a chance to write about it yesterday.  So I ended up making a lazy mans lasagna.  I got the recipe out of my Campbell's Cooking Companion cookbook which I must say  has a ton of good recipes in it!  So I decided to make the 'Fake Em Out Ravioli Lasagna. 

There's only a handful of ingredients...pasta sauce, ravioli, and cheese.

Ingredients

Serves: 6
  • Vegetable cooking spray
  • 1 (25.6 ounce) jar Prego(R) Italian Sausage & Garlic Italian Sauce
  • 1/2 cup water
  • 1 (30 ounce) package frozen regular size cheese-filled ravioli
  • 1 1/2 cups shredded mozzarella cheese
  • 2 tablespoons Grated Parmesan cheese for garnish
  • 2 tablespoons Chopped fresh parsley for garnish

Preparation method

Prep: 10 mins | Cook: 55 mins
1.
Heat oven to 375 degrees F. Spray 13 x 9 x 2 inch baking dish with cooking spray.
2.
Stir sauce and water in large bowl. Spread 1 cup sauce mixture in baking dish. Top with 1/2 the ravioli, 3/4 cup mozzarella cheese and 1 cup sauce mixture. Top with remaining ravioli and sauce mixture. Cover baking dish.
3.
Bake 35 minutes or until mixture is hot and bubbling. Uncover baking dish. Sprinkle with remaining mozzarella cheese.
4.
Bake 10 minutes or until cheese is melted. Let stand 10 minutes. Garnish with Parmesan cheese and parsley.

I used whatever pasta sauce I wanted.  The prep on this seriously took me like 5 minutes!  I found the best way to do the sauce since you mix it with water was I took a large (4 cup I believe) pyrex measuring cup and put the water in first and then mixed in the sauce.  Then when it says to pour 1 cup of sauce on the bottom of the pan it's super dooper easy to measure out!
I arranged the raviolis all nice and pretty :)
Then you just layer it like the recipe says.
Don't forget to put the foil on the pan!  I had put it in the oven and then re-read the recipe and had to quick take it out and cover it.  Then this is the yumminess that became dinner!
I then just made some quick garlic bread while this sat for 10 minutes.  Now my hubby said it was just ok, he's not a fan of red pasta sauce so I'm assuming that's what the main problem was as I thought it was good.  Nothing too exciting about it but it's tasty.  We both had seconds!  And it heated up nicely the next day for lunch!!

So all in all maybe not my best recipe so far but it was fast, easy and tasty!

9.02.2011

Meal 2 - Shepherd's Pie

So tonight I picked this Shepherd's Pie recipe once again from the Once a Month Mom website (I promise not EVERY recipe is from there! LOL)  Super easy recipe, would've been even easier if I would've used instant potatoes but I love homemade mashed potatoes!

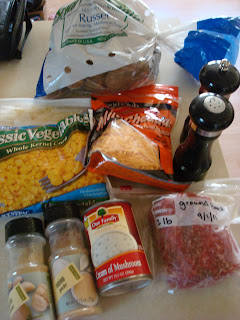
Here's all my ingredients and the recipe:

Ingredients:

  • 1  pound ground beef, browned
  • 1 can (10.5 ounces) cream of chicken or mushroom soup
  • 12 ounces frozen corn (or other veggie of your choice)
  • 1 teaspoon salt
  • 0.5 teaspoon pepper
  • 0.5 teaspoon garlic powder
  • 0.5 teaspoon onion powder
  • 2 cups mashed potatoes
  • 0.5-1 cup shredded cheese (optional)

Directions:

Mix browned meat with soup; season with salt, pepper, garlic power and onion powder–or other seasonings to taste. Layer meat mixture in the bottom of an 8×8 baking dish. Top with veggies. Prepare mashed potatoes according to package directions (if using instant). Spoon potatoes on top of veggies. Sprinkle potatoes with cheese (if using). Bake at 350F for 20-30 minutes or until heated through and top of potatoes are slightly golden brown and cheese is bubbly.


So I started out by browning my meat and boiling my potatoes.  I used about 10 small to medium sized russet potatoes (which was wayyy more than enough) and peeled them and chopped them to boil. 
I actually had used the pan to saute mushrooms first to throw in the freezer so it still had the mushroom juice left in it before I added the meat.  YUM! hahaha
Then I mixed the browned meat with 1 can of cream of mushroom soup and I decided to add in a small can of mushrooms cause we love them so much!!   I put it in an ungreased 8x8 pan.
I then took the corn I cut off our corn on the cobs last night and froze and put it on there.  I probably could've put more from another bag of corn but decided against it since we had the mushrooms.
Then my massive amount of mashed potatoes:
Then I just layered the potatoes on top and covered in cheddar cheese!!  Threw it in the oven at 350 degrees for about 20 minutes.
And voila!
Yummy Yummy Yummy!
My husband pointed out that it's just like my tater tot hotdish (coming later in the month) which it actually is except with mashed potatoes instead of tots and mushrooms instead of green beans! LOL
But it was very tasty, I thought the garlic powder was kind of strong in taste but my hubby thought it was just right.  So I guess just alter the seasonings to your taste.  And I'm sure this would be tasty with any kind of vegetable(s) and with instant potatoes, it's pretty fail-proof!

We did have just a little handful left as we both ended up having seconds, but that will make a good lunch tomorrow!
Happy dinner everyone!

9.01.2011

Meal 1 - Cheese Stuffed Chicken

Alright well it is the first of the month which means my newest endeavor of actually cooking supper every (almost every!) night this month.  I'm doing this to save money as we were spending around $250 every month on eating out!!!  Wayyyyy too much, plus not healthy at all!  So I went through cookbooks and websites to find recipes that sounded good.  Then I assigned one to almost every day this month (I left 4 days without a recipe for times when we might eat out for something special or make a pizza or I'm not home to make dinner.  Then I made my grocery list for the next 2 weeks of menus and went grocery shopping today.  I only spent about $30 more than I usually do!  So on to the meal!

Tonight I made Cheese Stuffed Chicken which I found on one of my absolute favorite websites.  Once a Month Mom.  Which is freezer cooking (see my earlier blog).  But they also have recipes on their website and this one I had bookmarked as soon as I had seen it.  And boy am I glad I did!  It was AMAZING!!!!

All you needed for this recipe was 5 total ingredients...and I only had to purchase one this shopping trip!

Ingredients:

  • 1 pound boneless skinless chicken breasts (mine were frozen and I marinated them while they thawed out)
  • 0.5 cups Lawry’s Seasoned Salt Marinade
  • 8 ounces Pepper Jack Cheese, shredded (I had slices that I had to use up)
  • 1 cup Panko Bread Crumbs
  • 0.5 cups ground french fried onion rings

Directions:

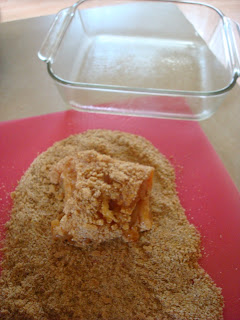
Preheat oven to 400 degrees. Spray a baking pan with cooking spray.  Cut chicken breasts in half lengthwise, basically fillet the breast so that you have to long flat pieces.** Marinate chicken breasts in Lawry’s Seasoned Salt Marinade for 30-90 minutes in a gallon sized zippered bag.  Remove chicken and add shredded cheese. Roll chicken and secure with toothpicks.  Place bread crumbs and ground french fried onion rings in a shallow bowl.  Dip the chicken back in the marinade, then place in the crumbs, coating the chicken evenly. Place the chicken on prepared pan and bake at 400 degrees for about 35 – 40 minutes or until done.
**If you are limited on time you can simply cut a pocket in the chicken breasts and insert cheese instead of rolling.

So like I said I used frozen chicken breasts and they are always so huge so I only used 2.  They marinated in the sauce while they thawed out.  I didn't measure the marinade, just poured in what looked good.  Then I crushed up a handful of french fried onions and it just happened to measure out to 1/2 cup.  Instead of cutting the chicken in half I pounded my chicken.  I just left it in the ziploc bag and pounded it with a meat hammer.  Since my chicken breasts were so large I then cut them lengthwise to make 4 smaller pieces. 
I then laid the pieces of pepperjack cheese on each piece:
Then I rolled each one as best as I could, but I didn't have toothpicks so I just held them tight.  I didn't need to re-dip them in the marinade as they were super wet.  So then I just rolled them in the bread crumb/onion mixture.  I could have easily halved the amount of bread crumbs, I ended up throwing a ton of it out.
Then I placed them all in a greased dish:
Then popped them in the 400 degree oven for 35 minutes.
While they were cooking I shucked and boiled some corn on the cob to eat as well:
I just threw the corn in a pot of boiling water with salt for 10 minutes.  YUM!
Then the final product!!
And yes it was as tasty as it looks!  Mmm I took the pieces with the burned cheese edges and I devoured em!! LOL My husband said the 1st meal was a success!
This recipe is definitely going in the recipe box.  It was super easy and cheap and yummy!  Technically the only item I bought was the french fried onions.  I had chicken in the freezer, cheese in the fridge, breadcrumbs and marinade in the pantry.  And the corn was even free as it was the "free item" at my husband's grocery store this week.  So this meal virtually cost me nothing!! 

I then cut the corn off of the remaining cobs and threw it in the freezer for tomorrow night's meal actually.  Love it!!

This is actually turning out to be more fun than I thought it would be...can't wait for tomorrow!

8.30.2011

The Line-up

So I have spent the last week going through cookbooks, scouring the internet and asking other people to find some recipes for the month of September.  I think I finally have the final line-up!  This would be easier if we weren't such picky eaters.  We don't really eat seafood so there's no fish dishes and my husband doesn't care for weird/healthy ingredients! LOL But it will be good for us to expand our horizons somewhat and I will get to try my hand at making a bunch of different things.  I don't think I'm great at cooking but I can manage. 

I've yet to organize these recipes so that they make sense in a calendar view so I know what to get at the grocery store and stuff.  I plan on making a spreadsheet with all the ingredients so I can kind of use similar ingredients during the same weeks.  Thursday will be my shopping day!  I'm actually kind of excited for this, I hope to stick to it, I found a lot of recipes that sound so yummy.  I only picked out 26 recipes for the month because we may eat out a couple times yet and there's things like frozen pizza or some of the meals I made and froze when I was pregnant.

So here's the line-up in no particular order!!!

Bacon Cheeseburger Chicken
Baked Ziti
BBQ Beef Cups
BBQ Chicken Pizza
Buffalo Chicken Calzones
Cheese Stuffed Chicken
Cheesy Chicken Roll-Ups
Chicken Enchiladas
Creamy Chicken & Wild Rice
Easy Chicken Pot Pie
Fake 'Em Out Ravioli Lasagna
Herb-Simmered Beef Stew
Jalapeno Beef & Corn Bread Pie
Jambalaya
Lasagna Primavera
Pepper Jack Mac & Cheese
Pumpkin Patch Stuffed Shells
Shepherd's Pie
Simple Salisbury Steak
Sloppy Joes
Slow Cooker Beef Stroganoff
Slow Cooker Chicken & Dumplings
Slow Cooker White Chicken Chili
Taco Pasta
Tater Tot Hotdish
Unstuffed Pepper Bake

8.25.2011

30 Days of Dinner

So like many other people we are on a limited budget and we're trying to pay off credit card debt/student loans/mortgage.  We have never been good at sticking to a budget....we've tried everything but we always veer off course and end up starting over again and again.  We don't make enough money and we spend too much!  So along with making yet another budget, trying to find little ways to make extra money and sticking to it all we are trying to cut back on eating out.  This has ALWAYS been our downfall, ever since we started dating 8 years ago.  Every week we would go to a local restaurant that had 2 for 1 burgers...go out to lunch a lot...go for desert after supper...and so much more!  It became a terrible habit of ours and has been the hardest for us to break.  I don't mind cooking and my husband loves to grill but for some reason we like to eat out as well.  He grew up in a family where they went out to eat A LOT, and they still do.  If we ever hang out with his mom or dad it is always going out to eat....unlike my parents who treated going out to eat like something special.  My mom made a lot of homemade meals or we always just had simple things like sandwiches, soup, cereal, etc.

So to try and stick with it this time I figured I would make it a game and blog about it, I will share each recipe I use including where I got it from, pictures, and how we enjoyed it.  I hope this will keep us accountable.  I plan on using recipes of my own, recipes from online and recipes from my oodles and oodles of cookbooks I own.  I figure we will have to spend a little more at the grocery store but it won't compare to what we spend eating out.  Plus it will go way farther than eating out does.

So to be fair I went through our bank statements to see how much we did spend on eating out.  This obviously doesn't include if we used cash but we usually use our debit card.  This will include if either of us ate out for lunch or we went out to dinner or ordered in.  Then I will compare September's statement at the end of the month and see the difference!

June: $263.41
July: $204.03
August: $258.07 (so far)

WOW!!  We had absolutely no idea that's what we were spending every month.  I'm assuming July was a little less because that's when I had my baby so we didn't go out much the first couple weeks. 

So this motivates us even more....even if I spend $50 more at the grocery store we will still come out ahead!  I will start the 1st of September which works out great cause my husband will get paid that day so it's my usual grocery day.  So as I scour my recipes over the next week leave me a comment with your favorite cookbook or website you get your recipes from!!

See you all in a few days with my dinner plan for the month of September!!

7.12.2011

The Birth of Mr. Gabriel John

Sorry I have been absent from this blog for a while, turns out this baby wanted to see the world a little early!  Here is my story.

Thursday, July 7, 2011
I had this day off and spent it running around doing errands, paying bills and ended up getting the last few things I needed for my hospital bag.  I was ending the night with a board meeting for my roller derby team and it was a long, long meeting.  I was pretty tired and uncomfortable during the whole thing and so we all joked that I would probably end up having the baby that night and we all went on our way.  I went home and watched some TV with my husband until we went to bed.  I had been having some small contractions here and there but they weren't painful or strong or regular so I didn't think anything of it.  We decided to head to bed at about 11:00pm or so and as I laid there I was pretty uncomfortable and still having some small contractions.  So I rolled over to watch the clock and thought I would start timing them....the last numbers I remembered seeing was 11:30pm before I dosed off.  Then all the sudden at midnight my water broke!!   I had no idea what to do and I woke my husband up and said "Oh my gosh, I think my water just broke!!"  He jumped up in a daze and said "What? Are you serious?"  LOL Well I stood up and sure enough a bunch of fluid came out and I looked at him and said "Yeah I'm serious!"  So we kind of wandered through the house cleaning up some of it, packing bags, reassuring our dogs everything was fine and I called my doula to let her know.  She said it's up to me when I want to go to the hospital and just to let her know.  So I calmed down and started trying to time the contractions but they were just so fast and irregular but they were definitely getting stronger!  So we headed to the hospital, which thankfully is only about 6 blocks away, and we were admitted by 1:00am.

Friday, July 8, 2011
She checked me and I was already dilated to 4cm and 100% effaced.  Wow we were gonna have a baby, and it was going to be soon!!!  I think we both were in so much shock, but we didn't really have much time as my contractions were getting stronger and faster!  By the time my doula arrived they were pretty strong.  I sat on an exercise (stability) ball for most of the labor and it helped so much.  It was just myself, my husband Derrick and my doula Jen in the room with me and it was perfect.  The lights weren't bright and I was able to just do my own thing.  Our attending nurse would stop in occasionally to see how I was doing and then would leave us alone which was really nice.  The staff was absolutely amazing!! 
By about 4:00am (approximately) she checked me again and I was at 7cm already.  Contractions were hard and close together.  I had a few moments where I didn't think I could do it but I would just power my way through and mind over matter I got through each and every one.  I had studied the Bradley Method of childbirth during my pregnancy and it mostly focuses on slow, deep breathing and envisioning the baby moving down and your cervix opening up.  I honestly believe it was these things that got me through (besides my wonderful family and friends) and that progressed me as fast as I did. 
At some point I ended up on the bed on my side so she could monitor me and my baby and I was getting so close that I just finished laboring there, which wasn't easy but I think at that point it wouldn't have been easy in any position!  We finally called our parents at about 5:00am to let them know and my doctor was called in.  Wow, this was really happening.  At that point all I could think of was that I wanted this baby out of me!!  LOL  I was definitely feeling the urge to push so my doctor checked me and I was almost at 10cm, but he wanted me to make it through a couple more contractions first which were seriously the hardest thing to do.  When your body feels that urge to push it is so hard to tell it not to!!  One of the many joys of doing everything naturally is you are able to listen and respond to your body, you have to just give in and let it do it's thing which is so hard!
The parents arrived and I told the mom's they could come in and watch....there were so many people in the room anyway that I didn't notice anyone!!  At about 6:00 or so (I'm actually totally guessing at this number!) I started pushing which was honestly the worst part of the whole labor.  It felt like it was taking forever but in all reality some women push for hours....I pushed for probably about a half hour.  The turning point was when he was starting to crown and everyone said "Oh my gosh! Look at all that hair!!"  Then I knew I was close.  I will NEVER forget the feeling of him finally coming out.  It honestly is surreal and indescribable.  We didn't know the gender of our baby beforehand so I was waiting for someone to say something.  Then at 6:30am I gave birth to this wonderful thing that had been growing inside of me! Little did I know he wasn't looking the greatest and everyone was preoccupied with trying to get him to respond.  I said "What is it!!?" And almost in stereo I heard "IT'S A BOY!!"  They did lay him on my chest but he didn't look very good and they took him right away to get fluid out of his lungs and assess him.  It seriously was such an amazing moment, my husband was crying and excited and it was just all so special!  They brought him over to me to say hi but then whisked him off to the NICU.  He was very pale and I'm not gonna lie he didn't look that great, I was so scared but knew he was in good hands. 
I got finished getting cleaned up and everything and I am proud to say I only tore a little bit that I didn't need stitches or an episiotomy.  We then waited....and waited....and waited.  We found out that the labor and delivery had went so quickly that it just took a toll on him and he was just kind of in shock from it all.  He had to receive fluids through an IV, was hooked up to oxygen and had monitors on for his breathing and blood pressure.  The first time I got to see him it was so hard.  I just cried and cried.  Here I was, I did everything naturally as possible and he still ends up hooked up to all these machines and medicines.  It really did a number on me mentally and emotionally.  I still hadn't held my baby and wasn't able to have him next to me.  He had been with me for the last 9 months and now he was just ripped from me and I had to try and deal with that.  That whole day was really rough for us.  We were running on no sleep along with the emotion of having our baby about 2.5 weeks early and now he's fighting for his life.  He thankfully responded to a lot of it very quickly showing he's a tough little man. 

Saturday/Sunday, July 9 & 10, 2011
We ended up spending the weekend in the hospital.  He was slowly weened off of the oxygen and held his levels on his own very well.  Then they wanted to start breast feeding to see how he did with that.  Just as any new mom and baby go through we had a tough go at first but quickly found a groove that worked.  We did have AMAZING nurses in the NICU, many of whom were certified lactation consultants which was seriously a god send!!  The last thing they were waiting on was his blood tests to make sure he came back with no infections, these also came back clean.  Our little man was tough and making a comeback!! 
Monday July 11th we were given the okay to take him home.  It was seriously the best feeling in the entire world.  I still have a hard time believing this cute little guy is ours to keep forever!!  My husband and I have fallen completely head over heels for this little 6lb 14oz human being.  We have been slowly trying to get into a routine with him but it definitely is a learning process and little Gabriel John is the one calling the shots!!

So I know that was super long and if you made it through the whole thing I commend you!  In some ways it went exactly how I had hoped/planned and in other ways it didn't.  But that's life.  We have this healthy, beautiful baby boy out of it and it has changed our lives forever.  In a month my husband and I will have been together for 8 years and in about 3 months we'll be married for 3 years...it really is an honor to share this with someone that has been with me through thick and thin, someone I love so much it's hard to say with words how much I love and respect him. 
Pregnancy and childbirth is truly something amazing that us as women are allowed to do in life.  We need to take those moments and cherish them, I already miss how he felt in my belly even though I have him in person now.  I was so eager for him to get here that I sometimes forgot to appreciate what my body was doing.  AND it is soooo do-able naturally.  Maybe I say that because my labor from start to finish was 6.5 hours long but it was hard and fast and by no means easy.  But I did it, we as women are strong individuals and we need to embrace that!!

I leave you with a picture of my bundle:

xoxo
SS

7.02.2011

The Last Stage of Pregnancy?

So as I hit the final stretch of this pregnancy I have come across another emotion PARANOIA!  I don't know if this happens to everyone or if I am just an exception but I am so paranoid lately.  Being as this is my first time I'm sure the paranoia hits more and maybe the fact that I am a control freak and this is pretty much all out of my control at this point, but I may have also just lost my mind....

Top Paranoia Thoughts:
  1. We didn't have a baby shower before so we aren't prepared. (Silly I know!)
  2. Is that amniotic fluid or did I just pee my pants again?  (This baby has a nice trampoline in there so that is most likely the answer!)
  3. I will never have enough cloth diapers.  (In all reality I can just wash them and then I will have more, or if it is an emergency I can splurge for disposables....maybe!)
  4. Was that a contraction or just gas!?  (My husband confirmed I was just super gassy last night...)
  5. If I forgot to take my prenatal pill every day will my baby turn out deformed??  (ummmm)
  6. Someone told me to get some depends for all the bleeding afterwards!  (ummmmm!)
  7. I don't have any nursing bras yet....do I need em?
  8. Baby isn't as active as it used to be, is everything ok?? (Probably, there's just not much room in there anymore....right?!)
  9. What if I can't 'produce' enough milk?  I will only formula feed as an absolute last resort.
  10. Will I be a good mother?!?? (I asked my husband this question and after many moments of silence he said yes....maybe not the most reassuring answer!)
I know a lot of these are so silly and people have said that it all works itself out after baby gets here but I can't help to feel all these crazy things!!  I freaked out cause I didn't have one pair of baby socks and thought that might be the end of the world so I went and bought some....so now in the 80-90 degree weather when my baby is born, they will at least have warm feet LOL

Please tell me I am just being a paranoid first mom!!?


xoxo
SS
7.01.2011

This Mama's Life: 100 Fan Celebration.

This Mama's Life has decided to have an an awesome giveaway of a bunch of fun products on her blog.  One of my newest products from my "Button Bow Collection" will be in this giveaway!  Super easy way to enter, just go to her blog (link below) and read through the directions! 

Here are the bows that are up for grabs:


The buttons are handmade from another amazing mama and then the bows themselves are crocheted by yours truly.  Then they are fastened with an alligator clip by sewing AND hot glue.  It's going to be so hard for me to part with these, I am so in love with them!!  So if you would like to try your hand at winning these all you have to do is like me on Facebook (www.facebook.com/stitchinsally) and then comment on the blog linked below!

Good luck and feel free to share with your friends!!

xoxo
SS

This Mama's Life: 100 Fan Celebration.: "Ok due to the crazy Facebook giveaway rules, we will hold our celebration here on the blog! The pictures of items that are up for grabs are..."

6.29.2011

The Interchangeable Flower Collection

So I finally was able to get my interchangeable flower crochet hats up and posted on my Etsy page.

These are hats that range in sizes 0-3 months all the way to child (3-10 years) all have a button that is attached securely to the crocheted hat and then you choose which flowers you would like to get for your hat.  I have two different sets you can choose from, the Basic Set which includes 1 hat and 2 flowers of your choice and the Ultimate Set which includes 1 hat and 7 flowers of your choice! 

The sizes are approximate and you should measure your child's head:
  • 0-3 months -- 13" cir.  6" height
  • 3-6 months -- 15" cir.  7" height
  • 6-12 months -- 16" cir.  7" height
  • 1-3 years (toddler) -- 17" cir.  7" height
  • 3-10 years (child) -- 19" cir.  8" height
Circumference is unstretched, they will stretch another inch or so. 

So on to pictures and listings!!!
All the hats in each size, going from smallest (top) to largest (bottom).  Remember the computer may distort colors slightly.  From top to bottom the colors are: light green, brown, ivory, black, and violet.  The hats can be made in any of these colors OR any of the flower colors!
Here are the current flower choices as well!  I will be constantly updating these as I am always picking up new yarn.


Here is the 0-3 month hat open just to show how the flower lays.

All hats and flowers are made from soft cotton and are made to order so you can customize them any way you want to!!  If you are a fellow blogger and you would like to have one as a giveaway contest or review please contact me by clicking the 'Contact Me' button on the top of my blog and I would be happy to work out the details with you!

Now on to the listings on Etsy!
Basic Set - 1 hat/2 flowers ($15.00 + shipping)
Ultimate Set - 1 hat/7 flowers ($20.00 + shipping)
Thank you for looking and let me know if you have any questions!!!
xoxo
SS